
Teardrop trailers have become increasingly popular among travel enthusiasts and DIYers alike. These compact, lightweight trailers are perfect for those who love camping but prefer a bit more comfort than a tent can provide. In this guide, we’ll walk you through everything you need to know to build your own DIY teardrop trailer. So, let’s get started!
Table of Contents
Why Choose a Teardrop Trailer?
Teardrop trailers offer several benefits that make them an excellent choice for camping and travel. Firstly, their small size makes them easy to tow with almost any vehicle, from small cars to larger SUVs. Additionally, they provide a cozy sleeping space and can be customized with various features like a small kitchen, storage compartments, and even solar panels.
Teardrop trailers also have a nostalgic charm, evoking memories of simpler times when camping meant hitting the open road with minimal gear. Their aerodynamic design not only looks sleek but also improves fuel efficiency, making them an eco-friendly option for travelers. Plus, the DIY aspect allows you to tailor the trailer to your specific needs and preferences, ensuring a unique camping experience every time.
Planning and Designing Your Teardrop Trailer
Before you begin building, it’s essential to plan and design your teardrop trailer. Start by sketching out your ideas and determining the dimensions that will best suit your needs. Consider the number of people the trailer will accommodate and what features you want to include.
Key Considerations:
- Size and Weight: Ensure that your trailer’s size and weight are compatible with your towing vehicle. Most teardrop trailers are around 4 to 6 feet wide, 8 to 10 feet long, and 4 to 5 feet high.
- Layout: Decide on the layout of the interior, including the sleeping area, kitchen, and storage. Think about how you will use the space and what amenities are most important to you.
- Materials: Choose durable and lightweight materials that can withstand various weather conditions. Common materials include plywood, aluminum, and fiberglass.
You can find various design templates and blueprints online, which can be a great starting point. However, feel free to modify these designs to better fit your needs. Some people prefer a more spacious interior, while others prioritize having a well-equipped kitchen.
Gathering Materials and Tools
Once you have a clear plan, the next step is gathering the necessary materials and tools. Here’s a list of some basic items you’ll need:
- Plywood for the walls, floor, and roof
- Insulation materials such as foam board or fiberglass
- Waterproof sealants and weatherstripping
- Aluminum sheets for the exterior
- Screws, nails, and wood glue
- Basic woodworking tools (saws, drills, sanders, etc.)
- Electrical components for lighting and any appliances
- Windows and doors specifically designed for RVs or trailers
It’s also a good idea to invest in quality tools if you don’t already own them. Having the right tools can make the construction process much smoother and more enjoyable. Additionally, consider safety gear like gloves, safety glasses, and ear protection to protect yourself during the build.
Building the Frame and Chassis
The frame and chassis are the foundation of your teardrop trailer, so it’s crucial to build them with precision and care. Start with a sturdy base frame that can support the weight of the entire trailer and its contents.
Construction Steps:
- Frame Construction: Use steel or aluminum to construct the frame, ensuring it’s both strong and lightweight. Weld or bolt the frame together securely.
- Axle and Wheels: Install the axle and wheels, making sure they are properly aligned and securely attached. Consider the weight distribution and balance of the trailer.
- Floor Installation: Attach the floor to the frame, using high-quality plywood for durability. Seal the edges to prevent moisture from seeping in.
Consider adding stabilizing jacks to the corners of your trailer to keep it steady when parked. Additionally, ensure the hitch mechanism is compatible with your towing vehicle and is rated for the trailer’s weight.
Constructing the Walls and Roof
With the frame and chassis complete, you can move on to building the walls and roof. This step requires careful measurement and cutting to ensure everything fits together seamlessly.
Construction Steps:
- Cutting the Walls: Measure and cut the plywood for the walls, making sure to include openings for doors and windows. Sand the edges to ensure a smooth finish.
- Insulation: Add insulation between the inner and outer layers of the walls to keep the interior comfortable in various weather conditions. Use foam board or fiberglass insulation.
- Roof Construction: Construct the roof with a slight curve to allow for water runoff, and cover it with aluminum sheets for added protection. Consider adding a vent or skylight for improved ventilation and natural light.
Use marine-grade plywood for added durability, especially if you plan to use your trailer in wet conditions. Additionally, apply a waterproof sealant to all seams and joints to ensure your trailer stays dry.
Adding Windows and Doors
Windows and doors are essential components of your teardrop trailer, providing ventilation, light, and access. Choose windows and doors that are designed for RVs or trailers, as they are built to withstand outdoor conditions.
Installation Steps:
- Cutting Openings: Carefully cut openings for the windows and doors, ensuring they are the correct size. Double-check measurements before cutting.
- Installation: Install the windows and doors, sealing the edges with waterproof sealant to prevent leaks. Use weatherstripping around the doors to ensure a tight seal.
Consider adding a small awning or canopy over the door to provide extra protection from the elements when entering or exiting the trailer. This can also create a shaded area for relaxing outside.
Interior Finishing and Utilities
Now that the exterior of your teardrop trailer is complete, it’s time to focus on the interior. This step involves adding insulation, paneling, and any utilities you want to include, such as lighting and ventilation.
Finishing Steps:
- Insulation and Paneling: Start by adding insulation to the walls and roof to keep the interior comfortable. Once the insulation is in place, cover it with plywood or another type of paneling to give the interior a finished look.
- Lighting and Ventilation: Install LED lights for energy-efficient illumination. You can also add a roof vent or small fan to ensure proper airflow and prevent condensation. Consider adding reading lights and USB charging ports for convenience.
Think about the placement of light switches and power outlets to make the interior functional and user-friendly. If you plan to camp in remote areas, consider adding a small inverter to convert DC power from your battery to AC power for standard appliances.
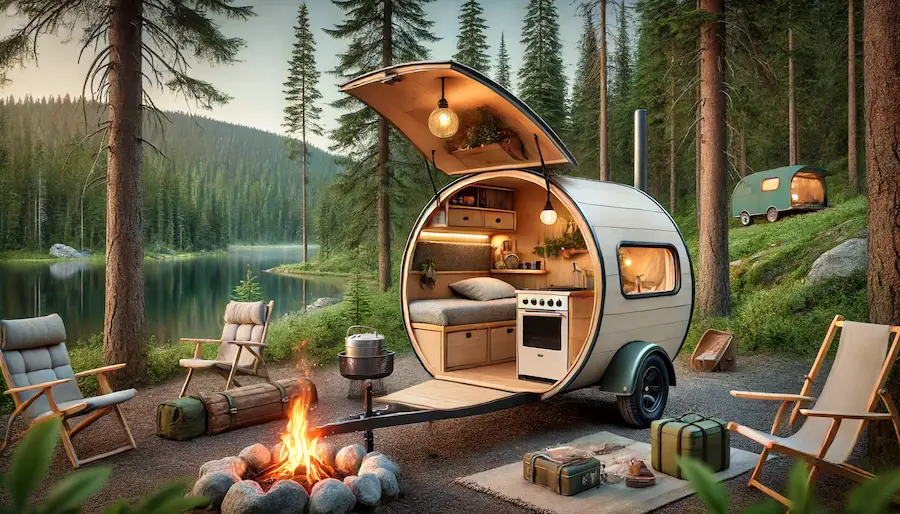
Creating the Sleeping Area
The sleeping area is the heart of your teardrop trailer. It should be cozy, comfortable, and functional. Consider adding a mattress that fits the space perfectly and storage solutions for your camping gear.
Setup Steps:
- Bed Frame Construction: Build a simple bed frame using plywood and 2x4s. Make sure it’s sturdy and fits the dimensions of your mattress. You can use a futon mattress or a custom-cut foam mattress for added comfort.
- Storage Solutions: Add storage compartments under the bed or along the sides of the trailer. Use bins or drawers to keep your belongings organized and easily accessible. Consider adding a small shelf or netting above the bed for additional storage.
To maximize space, consider foldable or collapsible furniture that can be stored when not in use. You can also add hooks and hangers for items like jackets, hats, and bags.
Building the Kitchen Area
A small kitchen can significantly enhance your camping experience. Most teardrop trailers have a kitchenette at the rear, accessible through a hatch.
Setup Steps:
- Kitchen Layout: Design a layout that includes space for a small countertop, a sink, and storage for kitchen utensils and food. Use durable and easy-to-clean materials like stainless steel or laminate.
- Installing Appliances: If you plan to include a small fridge, stove, or sink, ensure they are securely installed and properly vented. Consider a portable stove that can be used both inside and outside the trailer.
Include a water storage system, such as a jerry can or a built-in water tank, with a pump for running water. You can also add a small gray water tank for waste water from the sink.
Adding Electrical and Solar Power
If you want to enjoy modern conveniences while camping, adding an electrical system is essential. A basic system can include a battery, inverter, and solar panels.
Installation Steps:
- Electrical Wiring: Run electrical wiring throughout the trailer, connecting lights, outlets, and any appliances to a central control panel. Use a fuse box to protect your electrical system from overloads.
- Solar Power: Install solar panels on the roof to keep your battery charged. This setup is perfect for off-grid camping, providing a renewable energy source. Choose a solar panel system that matches your power needs, and consider a charge controller to manage the power flow to the battery.
Include a battery monitor to keep track of your power usage and battery levels. This can help you manage your energy consumption and avoid running out of power.
Final Touches and Decoration
The final touches are what make your teardrop trailer feel like home. Personalize it with decorations, paint, and any other features that reflect your style.
Finishing Touches:
- Painting and Sealing: Paint the exterior with weather-resistant paint and seal all edges to protect against the elements. Choose a color scheme that matches your personal style and makes your trailer stand out.
- Interior Décor: Add cushions, curtains, and other decorative items to make the interior cozy and inviting. Consider using removable and washable fabrics for easy maintenance.
Add personal touches like family photos, artwork, or travel souvenirs to make the space feel more like home. You can also install a small stereo system or Bluetooth speaker for entertainment.
Testing and Safety Checks
Before hitting the road, it’s crucial to test all the systems and perform safety checks. This step ensures that your trailer is roadworthy and ready for your adventures.
Safety Checks:
- System Testing: Test the electrical system, lighting, and any appliances to ensure they are working correctly. Check all connections and fixtures for security and functionality.
- Safety Inspections: Check the tires, brakes, and hitch to ensure everything is secure and in good condition. Make sure all seals are watertight. Test the trailer lights (brake, turn, and marker lights) to ensure they are functioning properly.
Carry a basic toolkit and spare parts, such as fuses and light bulbs, for on-the-road repairs. Also, have a fire extinguisher and first aid kit on hand for emergencies.
Preparing for Your First Trip
With your DIY teardrop trailer complete, it’s time to prepare for your first trip. Pack wisely and make a checklist to ensure you have everything you need for a comfortable and enjoyable camping experience.
Preparation Steps:
- Packing Essentials: Make a list of camping essentials, including bedding, cooking supplies, and personal items. Don’t forget essentials like toiletries, a first aid kit, and weather-appropriate clothing.
- Trip Planning: Plan your route and destinations, ensuring that you have access to necessary amenities like water and waste disposal. Check the weather forecast and road conditions to avoid any surprises.
Create a checklist of items to pack and tasks to complete before departure. This can include checking tire pressure, topping off water and fuel supplies, and ensuring all doors and windows are securely closed.
Maintenance and Upkeep
Regular maintenance is key to keeping your teardrop trailer in top condition. A little care and attention can go a long way in ensuring it lasts for many adventures.
Maintenance Tips:
- Regular Inspections: Perform regular inspections of the trailer’s exterior, interior, and systems. Look for any signs of wear or damage and address them promptly. Check for leaks, cracks, and any signs of rust or corrosion.
- Cleaning and Storage: Keep the trailer clean and dry, especially if you’re storing it for an extended period. Cover it with a protective tarp to shield it from the elements. Clean the interior thoroughly after each trip, and empty any water tanks to prevent mold and mildew.
Lubricate moving parts like hinges and locks to keep them functioning smoothly. If you store your trailer outside, consider using a breathable cover that protects against UV rays and moisture.
Conclusion: Enjoying Your DIY Teardrop Trailer Adventures
Building a DIY teardrop trailer is a rewarding project that combines creativity, craftsmanship, and practicality. Once your trailer is complete, you’ll have a cozy, personalized space that enhances your camping experiences and makes your outdoor adventures more enjoyable.
With your teardrop trailer ready to go, the open road awaits. Plan your trips with safety and convenience in mind, stay organized, and share the experience with friends and family. Embrace continuous improvement to enhance your trailer over time, making it even more comfortable and functional.
Check out the rest of the ‘Updated Ideas‘ site; there are some cool articles waiting for you! Fancy writing for us? Just give that contact button in the top right a tap. Cheers!